Here is a site with excellent examples of use of line as a value.
Hatching, Crosshatching, Stippling and more.
Monday, August 29, 2011
Contour vs. Gesture Drawings
.jpg)
Monday, August 22, 2011


Tuesday, May 31, 2011
Art Classes for Little Ones during the Summer
Come do ART this summer!
For ages 5-10*
Classes offered:
Basic Drawing June 7, 8, & 9
1:00 p.m.-3:00 p.m.
Learn to draw using the mediums graphite, charcoal and pastel. We will also learn how to use perspective in this class.
Fun Art June 21, 22, & 23
1:00 p.m.-3:00 p.m.
Come have fun with art by using different types of art materials. In this class we will learn how to collage, use texture, make patterns and use oil pastels.
Registration is $30 per class. All materials are included with registration.
Early bird registration is $25 per class. (Must be enrolled by June 1st ).
To register call 936-8001.
All classes will be conducted by Camille Sturges.
*I have found there to be quite a bit of interest for kids older than 10. If you have a child that is interested please contact me. I am considering doing a class specifically targeted to kids that are a bit older. Thanks.
Camille
Friday, March 18, 2011
My Butte

This is the drawing I did and used for the class room collage in Mrs. Spatz class. I have the original, and if you would like to use it, just contact me. I love to share.
Thursday, March 10, 2011
Classroom Collage

These Campbell's soup cans came from here, and when I saw them I so badly wanted to do something like that for our Art Show this spring.
My friend Suzanne who recently posted on this blog gave me the idea to go draw the Melba Butte then we could blow it up and use it as our art instead of the soup can. Then we could cut it up into equal parts and have each child contribute to a scene of the butte.
Currently I have the butte drawn up, and cut up, but this after noon I am going in to the classroom to have the children color their parts. I will take some pictures so that I can post it when we are done.
If you are interested in doing this project let me know and I can give you my drawing and other little tips.
Below are some more Campbell's soup cans.
![[HPIM2325.JPG]](https://blogger.googleusercontent.com/img/b/R29vZ2xl/AVvXsEh2Py0zSerWByZrTG-cO7K5Hdjq7zkqxxh-04TYWLNOCarCyn2NuyxzHaYvgdUYuTc7Wn_Pt1YgKMV7a-wB18FkIyqmqW0VUm18Qbt6o2tlCs-xA1b3Hl_XTkrRl5yh-8edEIbOvJhO4aw/s1600/HPIM2325.JPG)
![[HPIM2328.JPG]](https://blogger.googleusercontent.com/img/b/R29vZ2xl/AVvXsEj8SYY6_OPhVWSagVE-ZzzYGNKUGU_JZF3rpw78W6FARsPCEDZnNoFurXShQ0Eqk42C-7E9-8ygh5cKaZxaKdbudEZPfD7SVJd9OaoPGZsXynh4kCo8qfNy5Wb8lIaQuzH2HjsMAgQCo2Q/s1600/HPIM2328.JPG)
Another place I found on the web of some fun children's art displayed in a show is here.
Wednesday, March 9, 2011
Value, Texture and Shape
VALUE
I (Suzanne) was asked to share a couple of projects I've been doing for Art Mom. I do art for a 1st and 2nd grade class.
The first project was on Value. Value was something hard for me to explain but easy to see. First I asked the kids if I colored with a pencil would the color ever be different then black (dark grey)? There were some yes' and no's. I then took a plane white piece of paper and with a pencil scribbled back and forth pressing hard to make the color darker then as I went along the paper I used less force while pressing making the color lighter.


I (Suzanne) was asked to share a couple of projects I've been doing for Art Mom. I do art for a 1st and 2nd grade class.
I'm all about letting the kids imagination go wild when it comes to art! I'm constantly telling the kids that there is no wrong in Art. They can't mess up because it's what there imagination comes up with that creates the art!
The first project was on Value. Value was something hard for me to explain but easy to see. First I asked the kids if I colored with a pencil would the color ever be different then black (dark grey)? There were some yes' and no's. I then took a plane white piece of paper and with a pencil scribbled back and forth pressing hard to make the color darker then as I went along the paper I used less force while pressing making the color lighter.

For this project we used black and white paper. "Black and white offer a striking contrast when used together and create a strong visual image." (How to Teach Children Art by:Evan-Mor)
1. Give each child one piece of black and one white piece of paper. (Pre cut the white paper to half the size of the black). Have children draw 4 different lines on the white paper. (For younger kids you may want to pre draw the lines for them or have them follow along as you draw on the chalk board.) The key to making this successful is to draw BIG. Some of the kids drew their shapes to little making it very difficult to cut.
2. Have students then spread the white stripes across the black paper.
3. Let students experiment with variations and then glue the white strips in place.


****Just remember bigger shapes work best for this project especially when working with younger children.****
TEXTURE
For my lesson on texture I cut out several different shapes and textured some of them (my sister has a machine that can do this, but no worries this isn't the only way you can texture stuff!) I gave each student a couple of different sizes and shapes of paper.
Now here's the fun part...I told them to let there imaginations go wild, they could cut, tare, crumple, wrinkle, roll or whatever else they thought of so they could create the picture they had in their mind on the paper in front of them. Here's what they came up with.

This little girl wrote her mother's name!

This is a rain storm in the ocean! They tore the pieces of paper really small and waded them up real small to make rain! Genuis!!!

This is the ocean!

We've also talked about how some artist name their artwork so each month the kids have been coming up with names for the artwork. It's been really fun to see their creative minds work!!! This has been my most favorite project!
SHAPE
I cut out triangle and circle shapes. Each child got to choose one shape. I told them to think about what they wanted to create with their shape and then position it accordingly on their paper. There are some real creative minds out there. In years past I've had kids use a circle as a cat's face and drew the whole body around it. Or a triangle as the tip of the space shuttle. Here are this year's creations:

Climbing Mountains

Flower Power
Anyone for trick or treating? We did this project right before Halloween so it was definitly an ongoing theme.
Saturday, January 15, 2011
Kindergarten Art
Hello... I (Crystal Myers) was asked to share some projects I have done in the kindergarten classroom.
 |
| Example of rocket ship |
 |
| Example of houses |
I passed out to each table construction paper, glue, and then the shapes I had previously cut out (large and small squares of all colors, large and small triangles of all colors, and large and small circles of all colors).
The kids chose which example they wanted to copy and chose the appropriate shapes. Once the shapes were glued on, they used crayons to add details and (most importantly) their names.
 |
| "Rocket Ship" by Wyatt, age 6 |
The caterpillar example (not shown) consisted of a bunch of circles linked together to make the body and triangles below each circle to make the feet. On the first circle I drew antennae and a smiley face.
To the right is a version done by one of the students in the class. He even added men on the moon! (the red figures on the large yellow circle)
 |
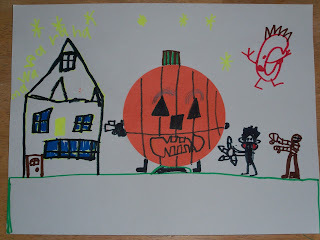
| Example of jack o' lantern |
 |
| "Halloween Pumpkin" by Wyatt, age 6 |
The next project I did was near Halloween, so using the same theme with shapes, we made jack o' lanterns. I cut out extra large orange circles for each student. They glued these onto a sheet of construction paper their choice of color. They then used crayons to draw vertical stripes on the orange circle. Once this was done, I handed out to each table a variety of shapes in assorted colors for them to use to make a face for their jack o' lanterns.
I was impressed with the creativity of the all the students!
The preparation for this project included cutting out small circles, squares, triangles, and stars in an assortment of colors.
 |
| Example of leaf rubbings |
For November I did a lesson on texture. I talked about what texture is (how something feels) and the different kinds of texture (bumpy like the playground outside, sharp like a cactus, smooth like the tops of the tables, fuzzy like the carpet, etc.)
 |
| Example of leaf rubbings with orange mat |
I then talked about the different types of leaves and their textures.
Next, I demonstrated how to place a leaf under a sheet of computer paper and using the side of a crayon (with the paper removed), color or rub the crayon over the leaf to make it's texture appear on the paper. I repeated the process with a different leaf and a different color of crayon until the entire paper was covered in leaves. Then I passed out supplies and let the kids go.
Once the students were done, they selected a sheet of construction paper in their choice of color to glue their leaf rubbings onto (an instant mat!).
Preparation for this project included finding a large assortment of leaves that I placed in zip-lock baggies for each table to share and peeling the paper off of crayons, which were also placed in zip-lock baggies for each table to share.
If you wanted to add a little bit of science/nature to this lesson you could identify the different types of leaves and the talk about the trees they come from (this leaf comes from a maple tree. We get maple syrup from some kinds of maple trees).
 |
| "Bubbles" by Wyatt, age 6 |
For December I did a lesson in color. I had small bowls in which I added tempera paint. In the first bowl I had blue paint. In the second I had yellow and in the third I had red. I asked the students what colors these were. I told them these are the PRIMARY colors. They're called "primary" colors because these are the colors you mix to make every other color of the rainbow. In a fourth bowl I added a lot of yellow to a little bit of blue and asked what color these two colors would make. Then before their very eyes I mixed the colors and green appeared. I did the same thing in a fifth bowl with a lot of yellow and a little bit of red and orange appeared. Then in the sixth bowl equal amounts of red and blue to make violet (purple). To each of these bowls I added a couple squirts of dish soap and some water.
Each student was then given their very own straw (NO SHARING!) and asked to demonstrate how to BLOW. Once this was done, I demonstrated how to make bubble prints: place straw into paint/water/soap mixture and blow until bubbles come to the top of the bowl, then gently lower piece of white paper over the bubbles and then gently lift up. On the paper should be a print of the bubbles.
I organized this activity by placing a different color of soap/paint/water mixture on each table. I had each group of students make a bubble print of the color at their table and then rotate (remembering to take their straws with them!) until each student made one bubble print of each color. Make sure that the students make the prints all over the paper, not just in one spot.
I've learned that computer paper is better than white construction paper because the construction paper absorbs a lot of water and then wants to tear.
This art project is a lot of fun and very messy. Beware of students who blow their bubbles WAY too big for their bowls! Also beware of students drinking the paint/water/soap mixture. It's hard for some kids not to suck-in when they have a straw (I've had this happen a few times); the soap/paint/water mixture tastes yucky, but is harmless. I've learned that computer paper is better than white construction paper because the construction paper absorbs a lot of water and then wants to tear. Also, use TEMPERA paint instead of acrylic paint. Acrylic paint stains clothes!
 |
| Example of bubble print turned into picture |
 |
| Example of bubble print turned into picture |
A variation of this project is to have the students just make two bubble prints and then have them turn the prints into a picture. (fish, turtles, dinosaur eggs, possibilities are endless!)
Tuesday, January 4, 2011
Assignments for Value
 |
| Famous Paintings coloring page |
This month I have thought about a few art projects that correlate with the element of value.
First
The coloring page linked above goes with my first idea.
Choose a coloring and print it out. Get enough copies to take to the class. (the school could copy for you)
Then let the students choose a color. They only get one color to color with. The cool thing is they are going to use the concept of value to make this picture interesting. Color lightly, then dark, add some black this could turn out very cool.

or

I think that you may be surprised at how wonderful this could turn out. The student will really enjoy this project. This is also a project that could look great for the Art Show that we plan on having in the spring.
Second
I would go to the link above and read the lesson posted there if you are interested in this. I really liked this and thought that it would be a great lesson. If you would like to just do your project in one color to emphasize the art element of value, that would be great. Just assign a simpler picture.
Georges Seurat's A Sunday on La Grande Jatte
a close up
Third
In high school my art teacher Mr. Carter taught me about value.
He gave each student a piece of paper. We were to make a border around our paper about 1/2 inch in from the edge. Then we had to scribble. It needs to be an open scribble, meaning that it should have some good space between lines for coloring in. We were told to color each spot in inside the scribbles. The rule is that they can not have two spaces of the same value touching. When we did this in high school, we just used our pencils to do different colors of gray.
Fourth
Fourth
Crosshatching and hatching
The last idea I came up with today was to use crosshatching and hatching to show how you can get different values from shading in this way.
Many examples of this can be found. I would recommend using this with an older age group as they will have more control with their fine motor skills than that of a 5 or 6 year old student.
To find a lesson plan on how to use crosshatching in value you can go here and there is an excellent lesson plan to follow.
Lastly
If you find that you are in need of more ideas for this month I know that the book I have had put in the Little Red School House (How to Teach Art to Children) has many more ideas. I can think of one in particular that looks like it would be a blast. So go ahead, take a looksy!
When you find that marvelous project, let me know what it is! I would love to post it on here so that we can show it to other Art Moms so that they themselves aren't scrounging around feeling stressed about what it is they need to do.
Subscribe to:
Posts (Atom)